Brief History
The beginnings of mass-produced wood flooring can be dated as far back as 1903, when an E. L. Roberts mail-order catalog offered “wood carpeting.” This flooring consisted of 1½ x 5/16-inch wooden strips that were glued to heavy canvas that was then installed by tacking it down with brads. The wood was then sanded and finished. The varnishes used were usually slow-curing tung oils from China. These were not durable in themselves, so the floors were hot-waxed and buffed to a shine with a floor brush.
Early examples of the “wood carpet” eventually evolved into more modern iterations, such as laminate flooring, which consists of melamine-infused paper as its upper layer, and wood-chip composite beneath. Laminate flooring typically features a printed or embossed top layer meant to approximate the look of real hardwood.
The current incarnation of engineered wood flooring has been available since the 1960s, and has steadily increased in quality, leading to improved advantages over traditional hardwood flooring.
Composition
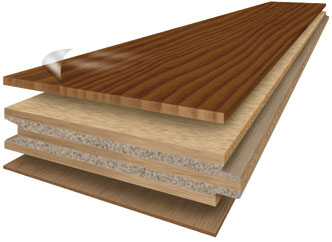
Engineered wood flooring is most commonly made with a plywood-core substrate and a real hardwood veneer or skin, which comes pre-finished from the factory. The top veneer, which looks just like the top of a traditional solid wood plank, is called the lamella. 
Some engineered flooring utilizes a finger-core construction, with a substrate comprised of small pieces of milled timber running perpendicular to the lamella. This can be made with an additional layer of plywood running parallel to the lamella, which gives it added stability. Fiberboard-core flooring is also available, but it’s generally considered to be an inferior option.
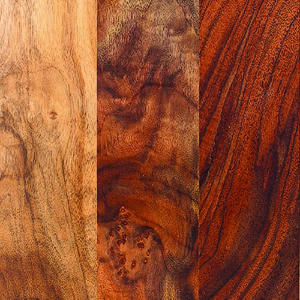
Engineered wood flooring is meant to be indistinguishable from traditional hardwood floor once it’s installed, and only the lamella is visible. The lamella veneers available are made from nearly every type of common wood, as well as many more exotic ones, in order to provide the same variety of aesthetics typical of quality hardwood floors. The substrate that the veneer is attached to is just as strong and durable as hardwood — if not stronger — and the finish applied at the factory often outlasts one applied on-site to solid wood flooring. Even surface effects are available that can be applied to the finish to give the flooring a time-worn look, such as light distressing.
Engineered flooring runs the gamut from the low end, starting at $3 per square foot, to the high, at $14 and more. To judge quality, check the thickness of the lamella, the number of layers in the substrate, and the number of finish coats. Typically, the more layers, the better. Listed below are descriptions of the advantages of adding layers to the construction in the common classes of engineered boards:
- 3-ply construction: 1- to 2-mm wear layer; five finish coats; 10- to 15-year warranty; 1⁄4-inch thick; current price is about $3 to $5 per square foot. Options for lamella veneer are limited to common species, such as oak and ash, and just a few stains are available;
- 5-ply construction: 2- to 3-mm wear layer; seven finish coats; 15- to 25-year warranty; 1⁄4-inch thick; about $6 to $9 per square foot. More species, such as cherry, beech, and some exotics are available for lamella, as well as all stains, and a few surface effects, such as distressing; and
- 7-ply or more: 3+-mm wear layer, which can be sanded two or more times; nine finish coats; 25+-year warranty; 5/8- to 3⁄4-inch thick; average price is about $10 to $14 per square foot. The widest selection of species is available for lamella, including reclaimed options. More surface treatments are also available, such as hand-scraped and wire-brushed.
The cost of engineered flooring can be around 20% more than that of traditional flooring, but the difference can be offset or recouped by saving on installation, staining and sealing.
Installation
Installation of engineered wood flooring is generally quite simple compared to the installation of traditional hardwood, and can often be accomplished by a homeowner without the help of a professional flooring contractor. If the services of a professional are enlisted, the job can be done more quickly and cost-effectively than if solid hardwood were to be installed. Engineered flooring can be fastened in place with screws or nails, glued down, or left to “float,” relying on its mass to hold it in place. Listed below are several installation methods:
- A bead of glue can be applied to the tongue of each board, which is then tapped into place with a block. The floor floats, unattached to the sub-floor except by force of gravity.
- A floor stapler and compressor can be used to rapidly secure the boards to the existing floor, without having to deal with any glue.
- Boards can be laid in a bed of adhesive, as is done with tile. This approach works particularly well over cured concrete, which precludes the use of staples.
- Some types of engineered floor are designed with milled tongues and grooves that lock together without glue or fasteners. It’s the quickest and cleanest installation method.
Advantages of Engineered Flooring

- Lamella veneer is available in dozens of wood species.
- Surface effects can be applied to further enhance its appearance.
- The factory finish can outlast site-applied finish on solid hardwoods.
- Drying time for the finish is eliminated because it’s pre-applied at the factory.
- It can be used in basements and over concrete slabs.
- Installation is quick and easy.
- It can be used over radiant-heat systems.
- It can be refinished to repair normal wear and tear.
- The core layer can expand and contract more freely without warping.
- The flooring can be removed and re-installed elsewhere, if desired.
Signature Inspections Hawaii, LLC, is FULLY Insured & “NATIONALLY CERTIFIED” by InterNACHI. InterNACHI also requires inspectors to continue their education through accredited courses, conferences, online learning, etc… and annual Inspector Certificate Testing in order to hold a current certificate.
Contact Us Today || Book You Inspection Now
808.388.3425
Trevor Drinen | CPI Certified Professional Inspector # NACHI16122702
*For a more detailed explanation of the inspection process please feel free to visit: InterNACHI Residential Standards Of Practice and InterNACHI Code Of Ethics .


